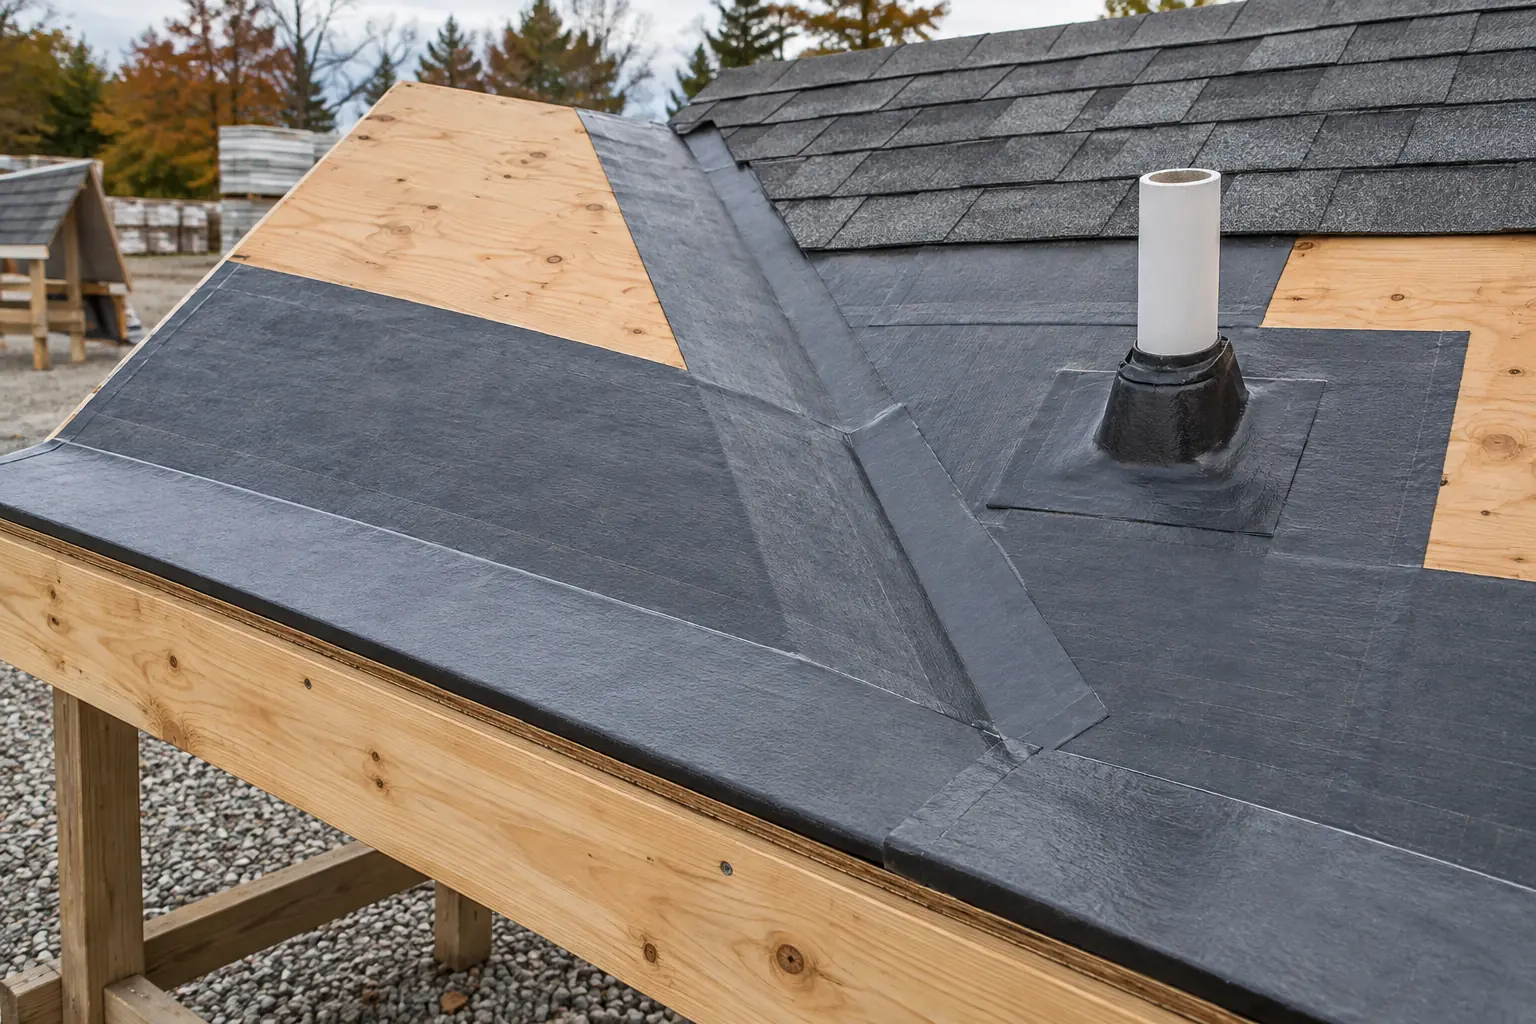
What ice and water shield is
Ice and water shield is a self-adhered leak-barrier membrane installed directly over a suitable roof deck. It creates a more continuous layer at vulnerable details and is designed to seal around compatible fasteners. Products and instructions vary, so the brand name should not replace the exact specification.
Field underlayment covers broad deck areas beneath shingles and helps shed incidental water. A leak barrier is used selectively where water can back up, collect, or reach complicated transitions. The two layers overlap as part of one water-shedding assembly.
GAF's WeatherWatch guidance identifies eaves, rakes, valleys, chimneys, and skylights among vulnerable areas where a leak barrier can add protection. Its FeltBuster instructions also separate field underlayment from leak-barrier placement. These are manufacturer details, not a statement that one layout fits every Virginia roof.
Deck preparation matters. The substrate must be suitable, clean, and dry enough for adhesion. Wrinkles, trapped moisture, debris, and poor laps can undermine the detail before shingles cover it.
The locations that matter most
| Location | Why water risk increases | Detail to confirm |
|---|---|---|
| Eaves | Ice or backed-up water can move beneath shingles near the cold edge | Deck bond, drip-edge sequence, and required inward extent |
| Valleys | Two slopes concentrate runoff in one channel | Continuous centered coverage and overlap with adjacent layers |
| Penetrations | Vents and pipes interrupt the roof field | Membrane, flashing, boot, and shingle sequence |
| Low-slope transitions | Water moves more slowly and can collect at a change in pitch | Approved covering, membrane extent, and transition flashing |
| Behind chimneys | Upper walls interrupt drainage and can collect water or debris | Back pan or cricket, step flashing, counterflashing, and membrane |
The table identifies inspection priorities. The final layout depends on geometry, slope, deck, covering, climate design criteria, and the manufacturer's details. Mark each location on the roof plan instead of relying on a generic allowance.
Ice and water shield at eaves
Eaves are the best-known application because snow can melt over warmer roof areas and refreeze near a colder edge. Water held behind that ice can move upslope beneath shingles. A bonded membrane at the deck provides protection beneath the covering in that vulnerable zone.
The inward extent cannot be chosen from roll width alone. It depends on the applicable requirement, roof overhang, wall line, slope, and product layout. A wide overhang may require more than one course to reach the intended position.
Drip-edge sequencing also matters. The leak barrier, metal edge, field underlayment, and shingles must overlap in the direction intended by the approved detail. Ask the proposal to identify that sequence rather than listing both materials without explaining their relationship.
Gutters do not replace eave protection. Clogged or frozen gutters can contribute to backed-up water, while an ice dam can form even when a gutter is present. Keep drainage maintenance and the concealed roof detail as separate parts of risk control.
Ice and water shield in valleys
Valleys carry runoff from two roof planes, so small detail errors can affect a large drainage area. A self-adhered membrane beneath the valley covering adds a continuous layer over the deck joint and fastener zone.
The membrane should lie flat and remain centered through the valley. Laps, end joints, intersecting valleys, and the lower termination need deliberate details. Folding or bridging the material over an uneven deck can leave voids.
The visible valley may be open metal or a shingle detail depending on the roof design. Ice and water shield does not replace that finished drainage surface. It supports the assembly beneath it.
Keep unnecessary fasteners away from the valley's primary water path. The applicable manufacturer instructions should control the exact no-fastener zones and shingle layout.
Ice and water shield around every penetration
Plumbing vents, exhaust outlets, skylights, and other penetrations interrupt the roof field. A leak barrier can support the flashing detail by bonding to the deck around the opening. It cannot compensate for a cracked boot, missing flange, or incorrect flashing sequence.
The order of layers should direct water back onto the roof surface. Lower components usually lap beneath upper components in a shingle-like sequence, but the exact detail follows the product and penetration assembly. Sealant alone is not a substitute for proper laps.
Count penetrations during the estimate and identify any that will be removed, replaced, or reused. An old boot surrounded by new shingles remains an old boot unless the scope changes it.
Future penetrations deserve the same care. Satellite, solar, or mechanical work added after replacement should use compatible attachments and preserve the roofing documentation.
Low-slope transitions and pitch changes
Where a steep roof meets a lower-slope porch or addition, runoff slows and the covering requirements can change. A self-adhered membrane may be part of the transition detail, but it does not make shingles suitable below their approved slope.
Ask the contractor to measure each plane and identify the proposed covering. If a membrane system is needed on the lower slope, the transition between systems must be designed so upper-roof water lands on the lower weathering surface.
Pitch changes can also concentrate debris and snow. Flashing height, membrane extent, and ventilation or wall conditions may need coordination. A line item reading “extra ice guard” is not enough to show the detail.
For unusual geometry, compare the plan with the selected asphalt shingle roofing instructions and any membrane-system instructions. Product compatibility matters where two systems meet.
Behind chimneys and upper walls
The uphill side of a chimney blocks water moving down the roof. A back pan or cricket can divert flow, while step flashing and counterflashing manage the sidewalls. Ice and water shield beneath those components provides another layer at the deck.
Membrane alone cannot correct undersized or missing metalwork. Masonry condition, counterflashing, siding transitions, and the chimney cap can also contribute to water entry. A complete inspection should separate each condition.
Wide chimneys or debris-prone locations may justify a more substantial diversion detail. The need and dimensions must follow the roof geometry and applicable requirements: [VERIFY: current requirement].
Photograph the concealed membrane and flashing stages before shingles cover them. Those records make future maintenance easier and show which layers were replaced.
Virginia code minimum versus best practice
Virginia's Uniform Statewide Building Code uses adopted model codes with state amendments, and local building departments enforce the applicable provisions. The current code cycle, project type, climate data, roof slope, and jurisdiction can affect what applies. This article does not state a universal eave dimension or code section as fact.
[VERIFY: current requirement] Confirm the current Virginia and local ice-barrier requirement for the property, including whether the project is new construction, replacement, repair, or work on an existing assembly. Also confirm the selected manufacturer's instructions and any warranty conditions.
Minimum compliance and a broader risk-based detail are different questions. A roof with long eaves, complex valleys, heavy shade, recurring freeze-thaw, or known vulnerable transitions may justify protection beyond a minimum. That choice should be documented, priced, and compatible with the system.
More membrane is not automatically better. Full-deck self-adhered coverage can change drying behavior, ventilation assumptions, removal effort, and cost. Building-science review may be appropriate before changing how the roof assembly manages moisture.
Why eave coverage matters in Northern Virginia freeze-thaw
Northern Virginia can move above and below freezing during the same weather cycle. Snow warmed by sun or attic heat may melt higher on the roof and refreeze at a colder eave. The result can hold water where shingles are designed to shed water downslope.
GAF's ice-dam technical guidance explains that ice dams are common at eaves and can also occur where roof surface temperatures change. That supports looking beyond a simple snowline. Dormers, valleys, shaded areas, and transitions can create local conditions.
Leak barrier is only one control. Air sealing, insulation, ventilation, drainage, and removal of heat sources can affect temperature patterns. A recurring ice-dam problem deserves an attic and roof-system evaluation instead of another surface patch.
Dark stains or old leak marks do not prove the current cause. Record when moisture appears and have the roof and interior conditions assessed. For active water entry, discuss roof repair in Northern Virginia rather than relying on a future replacement detail.
What to require in a replacement estimate
- Name the product. List the self-adhered membrane and compatible primer when required.
- Map every location. State coverage at eaves, valleys, penetrations, transitions, chimneys, skylights, dormers, and rakes where applicable.
- Define extent. Use dimensions or plan notes rather than “as needed.”
- Show sequencing. Coordinate deck, drip edge, membrane, field underlayment, flashing, and shingles.
- Address the deck. Explain cleaning, dryness, repairs, and concealed damage approval.
- Provide photographs. Capture representative concealed details before covering them.
A complete roof replacement in Northern Virginia scope makes the leak barrier visible on paper before it disappears under the roof. Ask for locations and details, not just roll count.
If the source of an existing leak is uncertain, a free roof inspection can begin the discussion. Some conditions require further testing or opening to confirm. The membrane plan should respond to evidence rather than treating every stain as an ice-dam problem.
Ice and water shield is most valuable when it is placed deliberately, bonded to a suitable deck, and integrated with the rest of the assembly. It is not a universal cure for missing flashings, poor drainage, unsuitable slopes, or attic heat loss.
Frequently Asked Questions
Should ice and water shield cover the entire roof?
Not automatically. Many roofs use self-adhered leak barrier at vulnerable details and field underlayment elsewhere. Full-deck coverage can affect cost, removal, and moisture behavior. The decision should follow the roof design, current requirements, manufacturer instructions, ventilation strategy, and building-science needs for the specific property.
Is ice and water shield the same as synthetic underlayment?
No. Ice and water shield is generally a self-adhered leak barrier used at vulnerable details. Synthetic underlayment is usually a mechanically fastened field layer beneath the primary covering. They have different installation instructions and roles, although they overlap to form one coordinated water-shedding assembly.
Does ice and water shield stop every roof leak?
No. It adds protection beneath vulnerable details, but it cannot correct failed flashing, damaged roofing, unsuitable slope, poor drainage, rotten decking, or uncontrolled attic heat and moisture. A leak investigation should identify the affected assembly and source before a repair or replacement detail is selected.